Tjuz.com

Tjuz.com

Saturday, September 23, 2017

Mild Yellow Fish Curry

Ingredients:

  • 2 Tablespoons rice bran oil in teh pan
  • 2 Teaspoons Cumin Seeds
  • 1/2 Teaspoon Fennel Seeds
  • 1 small cinnamon Stick
  • 10 to 15 dried Curry leaves
  • 1 cup of chopped shallots (green end)
  • 6 cloves of garlic (finely chopped)
  • 5 teaspoons of crushed ginger
  • 1 teaspoon of hot chilli paste
  • 1/2 cup of chopped coriander stems and roots
  • 1 1/2 Teaspoons of Tumeric
  • 1 1/2 Teaspoons of Garam Marsala
  • 1 Teaspoon of Sale
  • 1 Tablespoon of Tamarins paste
  • 1 Tablespoon of Tomato Paste
  • 500 Mls of Light Coconut Cream
  • 1.4 Kilos of Chopped white fish
  • 1 x finely chopped Sweet Potato (Yam)
  • 1 Tablespoon of Lemon Juice
  • 1/2 cup of chopped coriander leaves
  • 1 1/2 cups of Basmati rice (washed)
  • Server with Mango Chutney

Method:

  • Heat Rice BRan oil over a medium heat
  • Add Cumin, Fennel, Cinnamon Stick (cook for 2 min)
  • Ass Curre LEaves (cook for 30 seconds)
  • Add Shallots (cook for 3-4 minutes)
  • Add Garlic, Ginger, Chilli, Coriander stems/roots (cook 1-2 min)
  • Add Tumeric, Garam Marsala, Salt (cool 1 Min)
  • Add Tamarind Paste, TOmato Paste, 1 can of coconut cream and 1/4 cup of water
  • Bring it all to the boil then drop it back to simmer
  • Simmer for 6 min till it thickens
  • Add the chopped fish pieces
  • Add Remaining Coconut cream (second tin)
  • Cook uncovered for 20 minutes

Put the rice on:
  • 1 1/2 cups of rice
  • plus 3 cups of boiling water from the kettle
  • Lid on the pan for 15 min
  • After 7 min stir and loosen off the bottom of the pan

Serve Curry with Rice
  • Stir in the 1/2 cup of coriander just before serving
  • Stir in the Table spook of lemon juice just before serving
  • Add mango chutney to the side and roti bread for a treat.


Saturday, January 26, 2013

Very quick and easy gluten free eggs bennedict for breakfast


This morning I made a lovely Eggs Benedict for the whole family. Oh yes, very classy indeed for  Australia Day :-).

For something different rather than gluten free toast I created four very nice potato hash browns.

Hash Brown / Potato Rosti:

  • Simply grate one small potato per person squeeze out the water in your hand and fry in a plan. It's that quick and simple.  
    • (I cheated. I have a mini food processor permanently on the bench. So the grating took me 30 seconds). 
  • Let the patties sit for a while per side so they really crust up (so they don't fall apart).  
  • There is absolutely nothing to add.  Simply grate, squeeze out the water, form a pattie and fry.
  • Fry on a low heat.  Giving them around 6 minutes per side.
    • (You want everything to cook slowly as you have other things to cook and prepare).

Poaching Multiple Eggs At Once:

  • Crack four eggs into a bowl (being careful to keep them whole).
  • In a deep fry pan I added 1 inch of water and brought to the simmer. I added a splash of vinegar before adding my eggs.  
  • I let them simmer away for around six minutes to poach beautifully (the heat was that low).

Hash browns cooking, eggs are on.... time to do a lightning fast hollandaise sauce.
 

Hollandaise Sauce:
It's certainly not the traditional method. But it's how my grandma (of all people) showed me how to make it really quickly. It takes two minutes using the microwave. Yep that's right the microwave.
  • Add 60 grams of butter to a cup and melt it in the microwave in 30 seconds
    • Add another 40 mls of olive oil and use a fork to whisk into the butter
    • Put the cup of melted butter and oil to one side
  • Add 2 x egg yolks to a microwave bowl
  • Add one dessert spoon of squeeze lemon
  • Add two dessert spoons of tap water.
  • Whisk together and pop in the microwave for 15 seconds. Remove it and whisk it again.
  • Repeat this three more times  (a total of four times)
  • It will now be really thick almost solid. (Almost to the point of being scrambled egg)
  • Slowly stir through the melted butter and oil (not all at once) and whisk with a fork for around 2 minutes.
  • It should thin down into a lovely silky hollandaise sauce as you whisk.
  • Dip your finger in and have sneak a taste.  It should be pretty sour.
  • Add some cracked pepper and salt to taste
(Of course I should have had ham or bacon as well to call it a traditional Eggs Benedict, but that just wasn't available in the fridge this morning.  If you have it, of course add a slice of ham on there as well with the egg on top).

By now you're hash browns and eggs will also be ready.
Serve hot.  Pour just a little Hollandaise over the eggs.


You see! - I'm all class!. 

Happy Australia Day.
Lee :-)

Saturday, December 1, 2012

Spicy Chorizo Tortilla Filler


I have been travelling so much lately for work, that as you've no doubt realised, I haven't had much time to put recipes up on this blog. I still love to cook heaps... It's just I have slacked off on spending the extra couple of hours preparing and auditing to create each blog post.

So since I've been travelling so much, I thought a recipe inspired by my travels was definitely in order.

Yesterday I was a fraction early catching a flight back from Sydney when I called in to the Virgin Lounge.  Much to my surprise they had a Mexican Tortilla (or Nacho) sauce with a big "GLUTEN FREE" sign and a pile of freshly baked nachos and a massive stack of white corn tortillas.  Which honestly - in an airline lounge is pretty unusual.  I stuck with the GF Nachos as I figured it to be the safer option despite the sign actually saying the Tortillas were gluten free as well.  (I'm a lot more sensitive nowadays than I used to be... so generally I don't trust it unless I cook it.  But... in this case I gave it a little try).

So before I go any further... - Kudos to you Virgin Australia - Thanks for including a gluten free option in your lounge buffet.

Anyway - a spoonful of this sauce on a corn chip and I was in heaven.  It was REALLY good. Inspired - I actually rang ahead to my wife and asked if we could go out for Friday mexican with the kids. But alas that wasn't to be. So instead I've gone out of my way today to re create the Virgin Australia tortilla dish as best I could so we can have it as tonight's dinner.  I gotta say - I think mine's actually a tad better... but again, thanks VA for the inspiration.

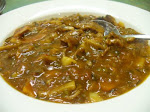
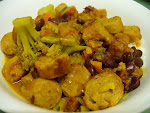
So here goes... my Chorizo Tortilla Filler.  It feeds 6 to 8 persons.  It's a one pot wonder that will take about 45 minutes to prepare. I think it would also make an excellent tapas dish at parties. Cut up the GF white corn tortillas and use them as finger food to mop up the sauce.  So keep this one in mind next time you have to "bring a plate" at your next party / barbecue and you're scratching your head trying to think of that Gluten Free option that everyone will eat, not just you.

Ingredients.
  • 2 x tsp of good quality olive oil for the pan.
  • 4 x chorizo sausages (GF ones of course)
  • 2 x packs of Mission white corn tortillas
  • 1 x finely chopped onion
  • 1 x tsp of coriander
  • 1/2 x tsp cumin
  • 2 x tsp crushed garlic
  • 1 x punnett of cherry tomatoes (each cut on half)
  • 1 x capsicum  (roasted / skin removed / finely chopped)
  • 3 x 400 gram tins of diced tomatoes to use as the base tomato sauce for the recipe)  (Note only 1 x 800 gram tin is displayed in the ingredients photo below. I found I needed to add 400 grams more as the sauce reduced)
  • 1 x 400 gram tin of chick peas (drained and rinsed)
  • 1 x 400 gram tin of red kidney bans (drained and rinsed)
  • 1 x healthy squeeze of lemon juice  (or half a lemon)

Method.
Spend ten minutes preparing the capsicum:

  • Begin by turning on the grill and placing it on high.
  • Chop up your capsicum into 4 or 5 pieces (seeds removed) and place the sections on the grill for around five to ten minutes. Place them flesh side down (skins up).  You want the grill to blacken and blister the capsicum skin quite heavily as it makes it easier to remove and also gives the capsicum a smoky flavour.
  • When the skins are blackened, remove them from the grill and rub them under running tap water and you'll find the skins will peel off quite easily.
    • You may need to grab some of the bits of capsicum skin and tear them off. But the majority should peel off with some rubbing
    • If all of this sounds too hard, you can buy jars of pre skinned capsicums in your supermarket condiments row.

Cooking the actual dish....

  • Add your olive oil to a large hot deep pan. (See photo for size of pan).
  • Slice up the 4 chorizo sausages
  • Finely dice your onion
  • Finely chop two cloves of garlic  (Or just use two teaspoons of crushed garlic from a bottle) and add to the pan
  • Add the chorizo pieces, onions and garlic together in the pan. They'll need to fry for about 5 minutes
  • While they are frying off, get your punnet of cherry tomatoes and slice each tomato in half and add to the pan as you go.
  • Finely chop up the roasted capsicum flesh and add to the pan.
  • Once everything's pretty well fried off, add 2 x 400 gram tins of chopped tin tomatoes.  (Note in the ingredients - I later add a third tin {add at your discretion} as I thought my dish was drying out too much
By now it should be smelling pretty great. Chorizo sausages are a real treat in my humble opinion. So time to "Mexican up" the dish with the final bunch of ingredients....It's surprisingly easy to add the mexican flavours that will absolutely transform your dish.

  • Grab a  lemon and give it a few hard rolls on the kitchen bench (as in apply pressure while rolling). It will soften up and be more juicy.  Cut it in half and squeeze half over the pan  (Be sure to cup in your hand so the lemon seeds don't fall into the dish).... OR... Use some squeeze lemon from the fridge if that's more convenient.
  • Open both the tin of Chick Peas and the tin of Red Kidney Beans.  Tip them both into a colander and run them under the kitchen tap for a minute or two to wash off their brine.
  • Once washed, toss them into the pan and stir them through
  • Go to your spice rack and grab the Cumin and Coriander powders.  Add half a teaspoon of Cumin and a whole teaspoon of Coriander to the pan. (You don't have to be too precious with the measuring... the more the better in my opinion).
  • Give your pan another thorough stir.  The smell through your house should just be amazing right about now.
  • Put a lid on your pan (not necessary) and drop your hot plate to simmer for a further 20 minutes. This allow all the flavours to infuse through the dish. You'll find the Chick Peas and Beans don;t need much cooking.
    • After 10 minutes, check the dish and decide for yourself if you want to add that third tin of chopped tomatoes (like I did).
  • With five minutes to go, get another large fry pan. Place it over a mild heat and start to heat your tortillas one at a time.
    • Place each one in the pan for around 20 seconds then flip to over for another 20 seconds.  I do this because it takes away the "rawness" you get with corn tortillas.  They just taste better warmed and cooked through.
      • Another way you can prepare the tortillas is it to re-stack them on a plate with a piece of kitchen towel between each one and then microwave the stack for anywhere  from 30 seconds to 1 minute. I don't like this method personally as they sometimes stick to the paper and quickly become overly dry.  But feel free to give it a go.

So now after the final five minutes of cooking and with your tortillas prepared - you're done!

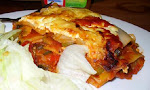
  • Place your pan on a chopping board and take it straight to your table.  (Less washing up AND more dramatic) :-)
  • Let everyone tuck in grabbing a tortilla each. 
  • Add a little filling then fold them into a pocket / envelope shape and enjoy eating.
Word of warning - it can get a little messy too. But that's half the fun too :-).


Serve with a light red wine if you're keen :-).

Enjoy,
Lee :-)

Thursday, May 12, 2011

Another Great Gluten Free Pizza Dough


Here's another recipe that I have started using as an alternative pizza dough.  
Sorry, no picture for this one.

Ingredients

  • 2 x cup gluten free plain flour (I'm a big fan of the white wings Gluten Free flours in the orange packets)
  • 10 grams of yeast (dessert spoon)
  • 2 x teaspoons of caster sugar
  • 1/2 a teaspoon of salt
  • 4 x dessert spoons of olive oil
  • 3/4 a cup of warm tap water
  • 1/2 a teaspoon of baking powder
  • 1 x teaspoon of Xanthum gum


Method

  • Place all the ingredients in a bowl and mix with dough hooks for about 1 minute. You know you've got the consistency right when it starts to form a ball in the bowl
  • Turn it out on to a flour dusted bench and knead lightly for 1 minute.
  • Wow it's actually a dough ball. it's not all sticky like a traditional pizza dough, more like pay dough consistency (You can tear it apart between your fingers)
  • Roll it into a ball and place it back in the bowl.
  • Cover with cling film and leave in in a warm place ( try the oven on 40 degrees celcius) and let it rise for 30 minutes)
  • Jab it lightly with your fingers to release the air out of it and you're ready.
  • Break off a large golf ball and roll  between sheets of grease proof paper sprayed with canola spray.
  • Add your toppings and cook in a very hot (300 degrees) over or closed barbecue for approx 4-6 minutes.


Sunday, May 1, 2011

Date Walnut and Fig Loaf

This was a great little experiment where I was trying to create a date loaf with a muffin type consistency.  It turned out just so well I thought I should share it with you all :-). The date loaf did turn out a little crumbly, but the flavour was extra special.  If you don't want it as crumbly, maybe halve the walnuts.

Special note... if you're going to store it, wrap it in cling wrap and store it in the fridge. It won't last more than a couple of days.

Ingredients:
  • 50 x grams Butter (melted)
  • 1 x cup Self Raising flour (GF)
  • 1/2 x cup Almond Meal
  • 1/2 x cup brown sugar
  • 1/2 cup crushed Walnuts
  • 1 x cup Dates (rough chopped)
  • 1/2 cup Figs
  • 1 x teaspoon of cream of tartar
  • 1 x teaspoon of cinnamon
  • 1/3 cup of Golden syrup  (about 4 spoons)
  • 2 x  small ripe bananas.
Method:
  • It's pretty easy actually. 
  • Mix all the ingredients in a mixing bowl.
  • Mash your bananas and add them last 
  • Beat for 3-4 minutes.
  • Pour into a loaf tin lined with baking paper and butter
  • Smooth off the top of the mix with a wet spoon.
  • Sprinkle on some extra crushed nuts for decoration

Baking:
  • Pre heat oven to 180 (fan forced)
  • The inside of this cake is always going to be pretty moist so it's hard to judge when it's done. I baked for 40 minutes... tested with a skewer, then baked for another 20.  Really you'll be your own best judge of when it's ready.
  • When I took it out of the oven I knew it would be crumbly, so I let it half cool in the loaf tin (so it keeps cooking).
  • Then I lifted out of the loaf by grabbing hold of the paper liner and let it fully cool on a rack before slicing.
Enjoy

Sunday, April 24, 2011

Ben's Recipe for Scrambled (Easter) Eggs and Bacon

This is just so cute I wanted to publish it straight away.  It's Easter Sunday today. So after an unhealthy dose of chocolates for first breakfast, I asked the kids what they wanted me to cook for second breakfast :-). There was some banter between Ben and his sister Melanie deciding whether poached eggs are better than scrambled eggs, but they both quickly decided "scrambled easter eggs" were the way to go.

However my son Ben says "Hang on Dad... I'll write you a recipe for your web site". So he runs out of the room and returns with a pen and paper. He then sits at the table and proceeds to write out his recipe and tell me exactly what I have to do next (okay I had to prompt him a little).

So here you have it.. Ben's "Scrambled Easter Eggs and Bacon".
Ben's Recipe:
For those of you who struggle to decipher the hand wirting of a 8 year old read below...
"How to make bacon and eggs"
  • Put the bacon in a hot pan
  • We will crack 6 eggs in the bowl
  • We gonna stir the eggs with a fork
  • Add a splash of milk
  • Put bread in a toaster
  • Put salt in the eggs to make them stick (he meant stiff)
  • Melt butter in pan
  • We draw eggs in the middle of a pan
  • Butter the toast
  • Put the milk in the fridge
  • Flick scrambled eggs in pan
  • Dish them up in plates
  • Cook some bake beans
Enjoy your breakfast

Thursday, April 21, 2011

*New* Gluten Free Hot Cross Buns Recipe. Easter 2011.

This year I thought I would try and make my hot cross buns recipe even better than the one I published a couple fo years ago. After eight batches I think I've got it pretty right. Tomorrow is Good Friday, so apologies for posting the recipe so late. Please try it. I think you'll find it's really worthwhile.
Ingredients:

  • 450 mls of buttermilk
  • 2 x eggs
  • 20 grams of yeast
  • 3 x dessert spoons of castor raw sugar
  • 450 grams of gluten free self raising flour
  • 2 x level dessert spoons of xanthum gum
  • 1 x teaspoon of salt
  • 1/4 cup raisins
  • 1/4 cup of mixed peel
  • 1/4 cup of sultanas
  • 1 x dessert spoon of mixed spice
  • 1 x dessert spoon of cinnamon
  • 1 x teaspoon of ground ginger (optional)... I like the kick it adds to the buns.

 Method:

  
Firstly some notes:

  1. Measure everyting precisely. I've made this 8 times before publishing and each time a small tweak of weight or time would either make or break the recipe.
  2. Have your ingredients out on a bench ready
  3. Setup your electric mixer with dough hooks.

Now let's get started...

  • Start by warming the buttermilk in a microwave proof jug for around 50 seconds (depending on your microwave till the buttermilk is blood warm. Doing this will help activate the yeast. Please make sure you don't overheat it too. You certainly don't want it to boil as buttermilk will quickly split. Using buttmilk is going to make the dough light and fluffy.
  • Add your 20 grams of yeast to the jug of buttermilk
  • Add your 3 dessert spoons of raw sugar to the jug of buttermilk
  • Give the yeast and sugar a good mix through for 40 seconds, then place the jug on a plate (to catch any overspill should it bubble over) and set the jug aside for 10 minutes. (Set a timer on the stove or microwave for 10 minutes). You'll find the yeast activates quickly and it will bubble and froth along. Which is great, that's just what you want.

You now have 10 minutes to prepare the rest of the recipe...

In your electric blender's large mixing bowl add all the remaining dry ingredients:

  • Add the 450 grams of Self raising flour (GF).
  • Add 1 x teaspoon of sale
  • Add 1/4 cup of raisins
  • Add 1/4 cup of sultanas
  • Add 1/4 cup of mixed peel
  • Add 1 x dessert spoon of mixed spice
  • Add 1 x dessert spoon of cinnamon
  • Add 1 x dessert spoon of ginger (optional)
  • Add 2 x level dessert spoons of xanthum gum.
  • Give all the dry ingredients a good stir through with a dry spoon.
  • Place bowl on your electric mixer.

Mixing...
  • Once the 10 minutes have past, crack two eggs into a glass and lightly beat them, then add them to the dry mix bowl.
  • Add the bubbly / frothy yeast mix to the dry ingredients.
  • Now turn on the electric beaters and mix your dough well for 5-6 minutes.
  • It should be quite a thick and truly sticky and doughy consistency.
    Gluten Free Hot Cross Buns dough. Mix well for 5-6 minutes.
Handling the dough...
  • If you do much gluten free baking you;ll know how hard it is to do basic stuff like turn out your dough. So I've learnt a simple trick...
  • Rip off a piece of over paper and place it on the kitchen bench. Then give it a light spray with some oil.
  • Now go wash your hands well in the kitchen sink and with wet hands, scoop out the dough from the mixing bowl onto the oven paper. You should find that if you keep wetting your hands and you use a wet knife, you should be able to handle the dough easily and divide your dough into 12 pieces.
  • Roll each one into a ball and place in a circle on a tray. (Or if you are more traditional try 3 rows of 12).
Let them rise...

  • Now cover your dough balls (I use a deep oven tray oer the top) and place is a warm place where they can rise for 45 minutes. I like to place them in the griller section of my oven because it's out of the way, it's not drafty and is pretty warm in there too. Again - use the microwave or oven timer and set it for 35 minutes.

Now clean up (while it's easy)...

That's the recipe pretty much done except for the baking. You've now got 45 minutes to clean up. Once thing I'v learnt with gluten free baking is to clean everythnig up straight away. If you don;t stuff sets like glue and it's twice as hard to clean later.


Baking...

  • Once the 35 minute warning bell goes off, turn your oven on to 200 degrees (fan forced) and set the timer again for a further 10 minutes.
  • Once that 10 minutes passes, uncover your dough buns. They should have risen butnot quite doubled in size. Lightly cut some crosses in the top of the buns with a wet knife if you want a more traditional looking bun. (I honestly cannot be bothered piping them with white dough sorry. I just care about how they taste).
  • Cook them in the oven for a total of between 25 and 30 minutes at 200 degrees till they are golden brown.
  • When they are cooked and if you can control yourself long enough, remove them from the oven and allow them to cool on a rack. If you want them to be shiny and glossy then mix a dessert spoon of castor sugar with 1/2 a cup of warm tap water till dissolved. Then lightly brush the buns with the sugary water using a baking brush.
Get into it....
  • Enjoy them warm with an obscence amounts of butter (Hey it's Easter. I never said they were healthy) a good cup of coffee and friends and family.

Yum. Freshly baked gluten free hot cross buns with butter.

Storing...
If you want to store them. I find it's best to break them apart and wrap each one in cling film, then place them in a container in the fridge and consume them over the next couple of days. I've never been a fan of freezing as it tends to make gluten free dough brittle. When it's time to eat them, 10 seconds in the microwave, then cut them in half and toast them under the griller.


Enjoy.

Happy Easter to you and your family. Stay safe on the roads.

Lee :-)

Sunday, June 27, 2010

A Lovely Winter's Sweet Curried Sausage Casserole

This evening, the fridge was a bit bare. I quickly created a sweet curried sausage casserole, which turned out so well that I thought I would also add it to the web site and tell you all about it.  I really like that this dish is packed with flavour. The mix of  fruit chutney and curry powder creates a really sweet, non traditional curry that will have you licking your lips and going back for more. Being a casserole, it's also one of those one pot wonders that are perfect for a Saturday night.  So there's not much cleaning up afterwards either. :-)

The photo's not too bad, but honestly it doesn't do it justice. What nicer meal could you ask for on a winter's evening? Comfort food at its best :-) This recipe took Bjust on an hour to cook and generously feeds the family of four.

Ingredients:
  • 2 x dessert spoons of peanut oil
  • 700 grams of gluten free beef sausages (about 12 sausages) {3 each for a family of 4}
  • 2 x small grated carrots (Try and grate them into long strips)
  • 1 x onion (finely sliced)
  • 2 x small potatoes (diced)
  • 80 x grams of raisins
  • 80 x grams of frozen peas.
  • 500 x grams of beef stock (2 x level teaspoons of Massel stock powder in 500 mls water)
  • 3 x heaped teaspoons of Keens Curry Powder (dark orange tin)  {GF}
  • 2 x 400 gram tins of diced tomatoes
  • 80 grams (3 table spoons) of your favourite chutney
Method:
  • Chop your sausages into equal lengths of four. Here's a hint.  Cut them semi frozen and they won't fall apart on you.
  • Use quite a large and deep fry pan.
  • On a medium heat, add the peanut oil and fry up the sausage pieces for five minutes until they are cooked through and golden brown.  (I use the peanut oil because it prevent the cut sausages from sticking to the fry pan).
  • Remove the cooked sausage pieces placing them in a small bowl lined with kitchen paper (to drain any excess oils).
  • Drain any excess oil from your fry pan too.
  • Finely slice 1 x onion and add it to the pan so they begin to fry.
  • Add your grated carrots
  • Finely dice 2 x small potatoes.  (I blanched them in the microwave for 2 minutes after I diced them my placing them in a bowl with a wet paper towel over the top. Once they are blanched - add them to the fry pan.
  • Add your 2 x tins of chopped tomatoes
  • Add the 3 tablespoons of chutney.
  • Add your frozen peas for colour contrast
  • Add your raisins
  • Mix well for one minute.
  • Add the sausages back into the mix.
  • Mix up your 500 mls of hot tap water and Massel stock powder.  Then also add your 3 x heaped teaspoons of Keens Curry powder (into the stock liquid).
  • Pour your curried stock into the pan and mix through quite well. 
  • That's it really.  For the next 30 minutes, let the stock reduce (lid off fry pan) so that it thickens into a yummy sweet curry sauce.
  • You'll find that when you first taste it the curry flavour seems a little under whelming (except for the taste of your chutney, which is likely a dominant fruity flavour).  Let it gently simmer/boil for the 30 minutes and you'll find the curry flavours build and gets stronger and stronger.  Stir occasionally.  It's easier to add more curry powder to increase the flavours if you'd prefer.  But it's near on impossible to take it away if you add too much too soon.
  • While you're waiting, prepare your rice in your rice cooker.
  • Serve in a bowl on a bed of rice and enjoy with the family. Oh, my daughter has now nick-named this.... "The Yummy Sofages meal".
 

Wednesday, June 23, 2010

A Really Quick Apple Tart Dessert

Last night, after a lovely winter stew, I felt like making a quick apple tart for dessert.  Because I already have balls of short pastry dough frozen in the fridge, a quick thaw a couple of hours earlier and creating the dessert only take about 20 minutes.

This recipe makes four small apple tarts. (Photo of small tart tins below).

Ingredients:

  • A thawed ball of Lee's Gluten Free Short Pastry  (2 hours to thaw)

  • 400 gram tin of pie apple pie filling.

  • 80 x grams of sultanas  (2 x 40 gram boxes of the kids' mini lunch box sultanas)

  • 3 x table spoons of brown sugar.

  • 1/2 x teaspoon of cinnamon

  • 2 x teaspoons of demereira sugar for the topping. (Optional)

  • 30 grams melted butter.

Method:
Prepare and blind bake pastry shells:

  • Pre heat a very hot 300 degrees Celsius oven.

  • Take a gluten free short pastry dough ball from the freezer and thaw roughly 2 hours before you need it. 

  • Roll it out really thin between two sheets of grease proof paper till the pastry is about 3 millimetres thick.

  • Take off one sheet of grease proof paper and place your tart tine upside down on the dough and cut around them.

  • Press the dough lightly into the tins.

  • Place then trays on a larger tray and blind bake your pastry shells for exactly five minutes.
Tart Filling:

  • You now have 5 minutes to prepare your pie filling.  Don't worry - it's really quick :-)

  • In a small mixing bowl add 400 gram tie of Apple pie filling, the sultanas, the brown sugar and the cinnamon.

  • Give it a quick stir with a spoon.

  • You're done.  (See, I said it would be quick) :-)
And... back in the oven for a quick bake 10 minute bake.

  • After exactly five minutes, remove the pastry shells from the oven, allowing them to cool. They should be a light brown.

  • Drop the temperature of your oven down to 200 degrees Celsius.

  • Heap a few spoon fulls of your apple tart filling into each of the pastry shells.

  • Dress with a few left over strips of pastry just to make the tarts look pretty (Optional)

  • Sprinke with a little demereira sugar. (Optional)

  • Place them bake in 200 degree oven for a further ten minutes.
Serve with a dollop of your favourite gluten free ice cream, or whipped cream.
They're great served cold the next day too. :-)  (Great to pre-prepare for parties).

Enjoy.
Lee :-)

Small tart tins

Sunday, June 20, 2010

Chicken, Leak and Mushroom Pie with Short Crust Pastry

Last weekend I had the parents in law over for dinner. So what was I going to cook?
I decided to be inspired by a recipe I saw in my local Coles supermarket for a chicken and leak pie. I've modified it a fair but to make it Gluten Free. In the interests of giving credit where it is due, special thanks must go to Curtis Stone and Coles for publishing a great family classic and inspiring my gluten free version.

Can I just say, that this recipe turned out great. Particularly considering this was my first attempt at making a chicken and leak pie.I did seriously misjudge how long this recipe would take to prepare and cook because I added in a gluten free Short Pastry which required some blind baking.  All up itt took me about two and a half hours from preparation time to sitting down to eat it. It was well worth it in the end as it did cement my position as the family's uber cook. (Which is always a good thing when you're serving dinner to the parents in law) :-)

So here's my gluten free version of a chicken and leak pie with the addition mushrooms and gluten free short pastry.


Ingredients:
Pie filling:
  • 1 x Leak
  • 1 x onion finely chopped
  • 2 x tablespoon of olive oil
  • 10 x regular mushrooms
  • 50 grams butter
  • 1/4 x cup of thickened cream
  • 400 to 500 grams of Chicken thighs
  • 3 x teaspoons of gluten free mustard (check it's gluten free.  I use Masterfoods).
  • 1/4 x cup of plain flour (GF)
  • 1 x cup of Massel chicken stock (GF) (I prefer the pre made liquid tetra packs as they are less salty than Massel cubes)
Dry Pastry Ingredients:
  • 120 grams White Wings Gluten Free Self Raising Flour(Orange Packet)
  • 120 grams of White Wings Gluten Free Plain Flour (Orange Packet)
  • 120 grams of Almond Meal
  • 4 x dessert spoons of GF Corn Flour
  • 2 x teaspoons of Xanthum Gum
  • 2 x tablespoons Castor Sugar
  • 1 x teaspoon of salt
Wet Pastry Ingredients:
  • 1 x teaspoon of vinegar
  • 4 x eggs
  • 80 mls good quality olive oil
You will also need a deep pie dish

  
Method:
  • Wash the leak (No, that's not me being rude):-) they usually pretty dirty on the inside, so a good rinse under the kitchen sink is warranted. 
  • The white storks on leaks are created by continuously piling up dirt around the base during the growing process so as to always cover the stem.  That's why they're usually dirty on the inside and white.
  • Slice down the centre then thinly slice across ways creating little half moons.
  • Place straight into a hot saucepan with 2 x tablespoons of oil and a knob (50 grams) of melted butter and begin sweating the leaks on a medium heat.
  • Finely chop your onion and add to the saucepan and mix with the leaks.
  • Finely slice your mushrooms.  The finer the slice, the stronger the mushroom flavour in the pie. 
  • On a fresh cutting board, cut your chicken thighs into long thin strips and add to the vegetable mix.
  • Cook for 5 minutes to ensure your chicken is cooked through.
  • Add 3 x teaspoons of seeded mustard and stir again
  • There should be quite a bit of available pan juices at this point.  So we want to capture all that flavour, but not have a runny pie filling.  So, slowly tip in 1/4 of a cup of gluten free plan flour stirring between each go.
  • Once you have added all your flour, add in your thickened cream and stir again.
  • Now pop on the saucepan lid and drop the temperature of the hotplate to a low simmer.  Check it occasionally to stir it through.  It should thicken up nicely now over the next 20 minutes.
Short Pastry:
  • Turn up your oven to around 300 degrees (yes very hot)
  • With you pie filling pretty much prepared (simmering away), you now need to make your pastry.  My gluten free shortcut pastry is a pretty simple recipe to follow and has never failed me yet. 
  • In your food processor add all seven dry ingredients (above) and briefly blend.
  • Next, crack in theour eggs, add a teaspoon of vinegar  and blend again.
  • Pour in around 80 mls of good olive oil.  Add your oil slowly.  Stop when the pastry almost forms a ball in the food processor.  That's perfect.  Time to stop.
  • Spray a sheet of grease proof paper and turn out your dough ball onto the sheet.
  • Knead the dough for 2 minutes
  • Cut off a thirds of the dough ball and place the  2/3rds piece in cling film and leave it to one side.
  • Roughly spread out the dough with your knuckles and then spray another sheet of grease proof paper and place on top.
  • With a rolling pin, roll the dough between the two sheets.  The secret here is to get it as thin as you can.  It should end up being about 2 to 3 mls thick and much larger that you probably need.
  • Peel off the top sheet of grease proof paper and place it to one side.  Now grab a hold of the bottom sheet of paper and flip the pastry upside down into your deep pie dish the peel off the grease proof paper.
  • Now it's time to blind bake your pastry base.
  • Remember, the oven is extremely hot, so don't over bake it.  You just want to get the baking of the base started. So stick to just the five minutes of blind baking.
  • Once five minutes has past, remove the pie shell from the oven and immediately turn your oven back down to around 180 degrees Celsius.
  • Fill the pie shell with the chicken, leak and mushroom filling.
  • With a second piece of the dough ball, repeat the process to roll out the roof of your pie.
  • Remove the top sheet of grease proof paper, then pick up the pastry and flip it over to form the pie lid.
  • Press the pie lid pastry to the exposed pastry shell.
  • Brush lightly with an egg wash (a scrambled egg) to ensure the pastry comes out a lovely brown. cut a few small slits in the pastry lid to let the steam out.
  • Place it back in the oven and bake your pie for about 25 to 35 minutes.  Basically, remove it from the oven when the pie lid pastry is a beautiful golden brown.
  • Allow the pie to stand and cool for 5 minutes.
  • Cut and serve with mashed potato and steamed vegetables.
  • Take the third piece of pastry, roll it into a ball, wrap it in cling wrap and freeze it.  The pasty keeps really well for several weeks in the freezer. It's great to thaw to make a quick apple tart dessert when you;re pressed for time (see my next post).
It's gluten free chicken and leak pie with mushrooms and short pastry is truly a great winter warmer. Please enjoy with family and friends. :-)

Oh, and please let me know what you think.  Post comments below.

Thanks,
Lee :-)

TOP